How to set up local development for Kirby and Tailwind — using the command line on macOS
Updated 20 May 2022: For the new version click here — or you can still read the original post below
In earlier Craft CMS experiments, I used CodeKit and MAMP Pro apps for local development on my iMac. But, I was never completely happy with them. They always felt like they were designed for ‘professional’ developers who already knew how to use the command-line — but who just wanted to save time and effort.
But as a beginner, I had different priorities. I was looking for a local development environment that didn’t force me to learn a whole new language. With a simple GUI, and as few weird, unexplained acronyms as possible.
In other words, CodeKit and MAMP Pro were not nearly as easy to use as I’d hoped. Nevertheless, they are capable, industry-standard apps, and I eventually did manage to get them to work.
Except, now that I wanted to use Tailwind, I couldn’t figure out how to get CodeKit to process its CSS. And, I kept reading that using the command-line was an essential skill — almost as though it was elitist badge of merit.
Eventually I gave in, and began trawling the web for tutorials. But, I struggled to ask the right questions on user forums. I felt rejected when I discovered that command-line problems were not in their remit. I abandoned the project several times. I even froze my iMac’s Finder, and had to do a clean install of macOS Catalina to fix it.
But, I got there in the end. And I have to admit that, once installed, this command-line set-up has been trouble-free, and easier to use than my previous GUI apps.
So, as a reminder to my future self — and as a starting point for others who have also been intimidated by this complicated process — I’ve compiled below a detailed list of all the steps I took.
Step 1 Set up Apple’s Terminal app to use ZSH
ZSH is the default shell that Apple now recommends in its Terminal app, since macOS Catalina.
Apple’s Support site has more details, including these instructions for resetting the Terminal to use ZSH:
-
Open the Terminal app, and after the prompt, paste or key in:
chsh -s /bin/zsh. Then press return.

Step 2 Practice using the command-line
If your command-line knowledge is as sketchy as mine was, I recommend Launch School’s excellent free guide, Introduction to the Command Line. I learned tons from this, and I wish I’d found it before I started. Its short section on $PATH and Executables is especially useful.
Also recommended, but for different reasons, is Tracy Osborn’s Really Friendly Command Line Intro. Tracy’s hand-drawn zine is only a starting point for beginners — but if you’re in a hurry, it might be just enough to get you through my step-by-step instructions below.
In fact, you might even manage with just these two little lists…
Step 3 Install Homebrew
Homebrew is a package manager for macOS, needed below to install PHP, Composer, and Node/NPM packages.
-
To install Homebrew, paste and enter the command at the top of Homebrew's front page. Currently, this is:
/bin/bash -c "$(curl -fsSL https://raw.githubusercontent.com/Homebrew/install/master/install.sh)"
It can take a few minutes until everything’s downloaded, and the Terminal has returned to its prompt line. -
Next we need to prepend Homebrew’s location to the PATH environment variable so that Terminal commands can find it. The command for this is
echo 'export PATH="/usr/local/bin:$PATH"'>>~/.zshrc. (The>>~/.zshrcbit prepends the path to the destination.zshrcfile in the home folder, and creates a new file if that doesn’t already exist.) -
To get the new PATH to take effect, quit and restart the Terminal app, or alternatively enter the command
source ~/.zshrc -
You can check if this has worked using
command-shift-.in the Finder to look for a hidden file called.zshrcin your home folder. This file can be opened with a text editor, and it should now have a line reading:export PATH="/usr/local/bin:$PATH" -
Also, check that Homebrew is installed, and can be found by the Terminal, by entering the command
brew -vto output Homebrew’s version info. -
To upgrade or delete Homebrew’s packages, checkout the glossary and instructions on their FAQ page. Importantly, this means updating Homebrew and all its formulae first, using the command
brew updatebefore upgrading a package, egbrew upgrade php
Step 4 Install PHP
To install Kirby's recommended version of PHP (currently 7.4), using Homebrew:
-
Enter the command
brew install php@7.4 -
Then enter the command to start PHP running in the background (now, and automatically at every future macOS startup):
brew services start php@7.4 -
To confirm that this newly-installed PHP version is now active, enter
php -v, to to confirm that it’s 7.4, not the macOS default 7.3.
Update, 11 June 2021
After encountering problems with PHP version 8, I’ve reinstalled PHP7.4. But now, Homebrew seems to have installed its files in a new /usr/local/opt/php@7.4/bin directory instead of the expected /usr/local/bin
-
A fix for this is to add another PATH variable to the
~/.zshrcfile, by running the command:echo 'export PATH="/usr/local/opt/php7.4/bin:$PATH"' >> ~/.zshrc -
Don’t forget to quit and restart the Terminal app, or alternatively enter the command
source ~/.zshrc, to get the PATH to take effect.
Step 5 Install Composer
Composer is a dependency manager for PHP (like a package manager, but per-project instead of system-wide). It’s needed below to install Kirby and Laravel Valet.
To install Composer I used Homebrew again (simpler to install and upgrade, than the instructions on Composer’s website):
-
Enter the command
brew install composer -
Then create another PATH variable by entering
echo 'export PATH="$PATH:~/.composer/vendor/bin"'>>~/.zshrc -
To activate this PATH, either quit and restart the Terminal app, or enter the command
source ~/.zshrc -
To confirm all is well, enter
composer -vto output Composer’s version info.
Step 6 Install Kirby CMS
First we set up a folder structure for local development files, and then use Composer to install Kirby CMS.
Inside our home folder we’ll create a local development folder I’ve called ‘My Sites’, and inside that we’ll use Composer to create (and populate) a folder for the new Kirby site, that I’ve called ‘mysitename’.
This site folder name will later be used by Laravel Valet to serve its local URL, at http://mysitename.test, so it would be simplest for you to make ‘mysitename’ exactly the same as your new site’s domain name.
-
Enter the command
cd ~, to make sure you’re in the home directory, thenmkdir 'My Sites', followed bycd 'My Sites' -
Then install either Kirby’s Starterkit or Plainkit, based on Kirby’s Starting a new project recipe — using the command
composer create-project getkirby/starterkit mysitename, orcomposer create-project getkirby/plainkit mysitename -
In addition to Kirby's folder structure, this will also create a couple of extra files needed to control future updates using Composer:
composer.jsonandcomposer.lock -
As described in more detail in Updating Kirby, the command to update the version specified in
composer.jsonis:composer update getkirby/cms, orcomposer update getkirby/cms -wto include all dependencies.
Step 7 Install Laravel Valet
Laravel Valet is a virtual web server that runs ‘locally’ on your computer, in the background on macOS.
After installing Valet using Composer, and setting up the valet park command, every site folder inside the ‘My Sites’ folder becomes accessible to any browser on your computer, at http://mysitename.test, http://mysitename1.test, http://mysitename2.test, etc.
You only need to set up Valet once — after that everything runs automatically each time macOS restarts — and, for me, so far it’s been completely transparent, and trouble-free.
-
First, quit MAMP or any other server apps running on your computer.
-
To install Laravel and Valet, enter the command
composer global require laravel/valet -
Then enter
valet install -
To check Valet is installed, and accessible, enter
valet -v, to get its version info. -
And then confirm that its server is running, with the command
ping valet.test, which should return127.0.0.1. Entercontrol-cto stop the pinging! -
To set up Valet to serve all the project folders inside the ‘My Sites’ folder, first make sure you are working inside the ‘My Sites’ folder with the command:
cd ~/'My Sites' -
Then enter the command:
valet park -
That’s it! Because all of Kirby’s content is stored as files in macOS’s folder hierarchy, there’s no need to set up a database. So, you should now be able to access your newly installed Kirby site, live in any browser on your Mac, at
http://mysitename.test -
You can install, or just drag and drop, other Kirby sites into your ‘My Sites’ folder, anytime in the future, and these will be automatically served by Valet, with no other commands needed.
-
To get a list of all the sites served from the ‘My Sites’ folder, enter
cd ~/'My Sites', thenvalet parked, then your macOS account password when prompted. -
Checkout Laravel's excellent documentation for more info on updating, maintaining, customising, and troubleshooting Valet.
If you don’t want to install TailwindCSS, but you do want to run Browsersync, you should first install Node and NPM in Step 8, and then skip to Step 17.
Step 8 Install Node and NPM
Node.js is an important JavaScript runtime environment, and NPM is its package manager. Both are needed below to set up TailwindCSS processing, and then to install Browsersync. I installed them using Homebrew (I’d read here that this avoids some permissions complications of using Node’s official installer).
-
To install Node and NPM together using Homebrew, simply enter
brew install node -
You can confirm that these are correctly installed, and available to Terminal commands, by entering
node -v, ornpm -v, to output their version numbers.

Step 9 Watch Tailwind’s installation video
Adam Wathan’s Setting up Tailwind screencast whizzes through the installation process, demonstrating all the files and commands needed to set up Tailwind and PostCSS. To keep up, I had to take screenshots of most of the entry screens, and although I’ve reproduced these in the steps below, I’d still highly recommend watching this video. (You’ll probably want to watch Adam’s excellent Designing with TailwindCSS screencasts too.)
Step 10 Install and set up PostCSS + Autoprefixer
PostCSS and Autoprefixer are Node packages that Tailwind uses to process its files, and then output them to CSS.
-
Create an empty
package.jsonfile in themysitenamefolder by entering the commandcd ~/'My Sites'/mysitename, and thennpm init -y -
Then install the packages needed, by entering the command
npm install tailwindcss postcss-cli autoprefixer. This creates a new folder callednode_modules, inside themysitenamefolder, to store these in. -
Create an empty
tailwind.config.jsfile in themysitenamefolder, by entering the commandnpx tailwind init -
Create a new
postcss.config.jsfile in the same folder, by entering the commandtouch ~/'My Sites'/mysitename/postcss.config.js -
Open
postcss.config.jsin a text editor, and list the plugins we want to use, by pasting or keying in the following:
module.exports = {
    plugins: [
        require('tailwindcss'),
        require('autoprefixer'),
    ]
}
Step 11 Add PostCSS-Nesting plugin (optional)
The PostCSS-Nesting plugin enables W3C-style nesting in Tailwind’s CSS. I used it extensively to code my site’s Markdown and KirbyText content, with nested patterns like this:
.content {
  & h1,
  & h2,
  & h3 {
    @apply mt-6 sm:mt-8;
    & + * {
      @apply mt-2 sm:mt-3;
    }
  }
}
-
Make sure you’re still in the
mysitenamefolder, by entering the commandcd ~/'My Sites'/mysitename -
Enter the command
npm install postcss-nesting -
Open
postcss.config.jsin a text editor, and insert ‘postcss-nesting’ into its list of plugins, by pasting or keying in a new line, so that it now reads:
module.exports = {
    plugins: [
        require('tailwindcss'),
        require('postcss-nesting'),
        require('autoprefixer'),
    ]
}
Step 12 Set up a new CSS file to control Tailwind
Here we’ll set up the main CSS file that controls Tailwind processing and customising.
-
Create a new folder, which I’ve called
stylesheets, inside your Kirby site’ssitefolder, by entering the commandmkdir ~/'My Sites'/mysitename/site/stylesheets -
Create a new file, which I’ve called
main.css, inside this new folder, by entering the commandtouch ~/'My Sites'/mysitename/site/stylesheets/main.css -
Open
main.cssin a text editor, and set up Tailwind’s processing directives, by pasting or keying in the following:
@tailwind base;
@tailwind components;

/* ---- custom css and @apply components go here ---- */

@tailwind utilities;
Step 13 Set up CSS processing, using the PostCSS plugin
First we create a new style.css file.
And then we’ll insert a couple of scripts into the package.json file, which will process the main.css file through the PostCss plugins, and output its compiled CSS into the new style.css file:
-
If you’re using Kirby’s PlainKit, you’ll need to create a new folder, called
assets, inside themysitenamefolder, by entering the commandmkdir ~/'My Sites'/mysitename/assets -
Create a new file, which I’ve called
style.css, inside theassetsfolder, by entering the commandtouch ~/'My Sites'/mysitename/assets/style.css -
Open the
package.jsonfile in a text editor and insert the following lines, just after the line"main": "index.js",:
"scripts": {
    "build": "postcss site/stylesheets/main.css -o assets/style.css",
    "watch": "postcss site/stylesheets/main.css -o assets/style.css --watch",
},
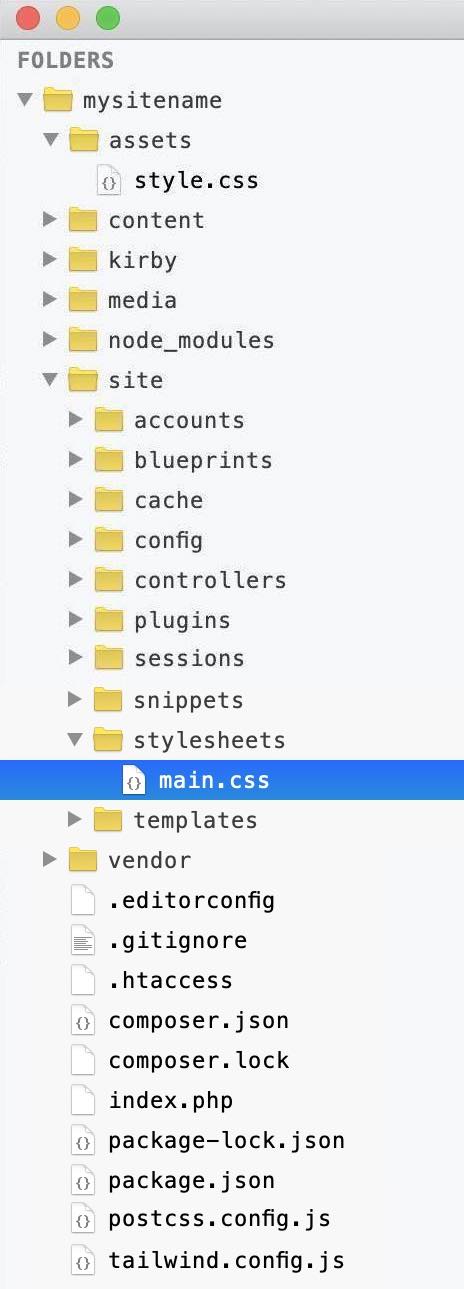
Depending on your own customising, the folder structure for your new Kirby site should now include all the files and folders shown in the screenshot alongside
Step 14 Link Tailwind to your Kirby templates, and process its files
To process all the Tailwind directives, custom CSS, and @apply components from your main.css file, and then to save them into your style.css file:
-
Using Kirby's CSS helper syntax, link the new
style.cssfile to your Kirby templates, by adding this new line to their<head>elements:<?= css('assets/style.css') ?> -
Make sure you’re still in the
mysitenamefolder, by entering the commandcd ~/'My Sites'/mysitename. (It’s easy to forget this step, when you’re busy coding.) -
EITHER enter the command
npm run build, to process yourmain.cssfile, once only. -
OR enter the command
npm run watch, to process yourmain.cssfile, automatically in the background, every time you save it. -
To stop the
watchcommand, entercontrol-c
Step 15 Set up PurgeCSS
As explained in Controlling File Size, Tailwind’s generated CSS file is huge, and it needs to be ‘purged’ for production use.
The latest Tailwind versions >1.4 already incorporate the PurgeCSS plugin for this, so you only need to set up the scripts:
-
Open
tailwind.config.jsin a text editor, and paste or key in the ‘purge’ script below (based on the file locations set up as in Step 13’s screenshot):
module.exports = {
    purge: [
        './site/templates/*.php',
        './site/snippets/*.php',
        './site/stylesheets/*.css',
    ],
    theme: {},
    variants: {},
    plugins: [],
}
Step 16 Generate a production-ready CSS file using PurgeCSS
The next step is based on Jens Törnell’s super-helpful comment on GitHub, which details how to use the NODE_ENV environment variable to automate the production build process (as mentioned, but not explained, at the end of Adam Wathan’s screencast).
-
Install the Cross-env plugin by entering the command
npm install --save-dev cross-env -
Open the
package.jsonfile in a text editor, and insert a new ‘production’ line as below:
"scripts": {
    "build": "postcss site/stylesheets/main.css -o assets/style.css",
    "watch": "postcss sitestylesheets/main.css -o assets/style.css --watch",
    "production": "cross-env NODE_ENV=production postcss site/stylesheets/main.css -o assets/style.css"
},
Now that this is set up, you can use the ‘production’ command to weed out all your unused CSS:
-
Make sure you’re in your
mysitenamefolder, by entering the commandcd ~/'My Sites'/mysitename -
Enter the command
npm run production, to process yourmain.cssfile, ‘purge’ its CSS, and then output production-ready CSS to thestyle.cssfile, once only.
Generating this production stylesheet only takes a few seconds. Then, because Kirby is file-based, it normally only needs a couple of minutes more (and just one click), to synchronise the entire local site with its ‘live’ internet server, using an FTP client such as Forklift.
Step 17 Set up and run Browsersync
Browsersync runs in the background watching for changes to your files during local development, and automatically triggers a refresh in any open browser window. It’s easy to install using NPM, and for me, it’s been completely reliable and trouble-free.
-
Open a new Terminal window, and make sure you’re in your site’s folder by entering the command
cd ~/'My Sites'/mysitename -
To install Browsersync locally, enter the command:
npm install browser-sync --save-dev -
Then, to run Browsersync in the background during development, you enter something similar to this example command, but adjusted to your site’s specific file structure:
browser-sync start --proxy "mysitename.test" --files "assets/style.css, site/snippets/*.php, site/templates/*.php, content/*/*.txt, content/*/*/*.txt, content/*/*/*/*.txt" -
As soon as it’s run, this command will automatically open your site in a new browser tab, at
localhost:3000, and this will refresh every time you save one of your watched files during development. -
To stop Browsersync, enter
control-c
Tip 1: The example command above will watch for changes to style.css in the assets folder; to PHP files in the snippets and templates folders; and to text files which are 2, 3, or 4 folders deep in the content folder.
Tip 2: To preview edits made in Kirby’s content panel, open http://mysitename/panel/yourpage in one browser window, and localhost:3000/yourpage in another. But avoid using localhost:3000/panel/yourpage for the panel edits, as this (annoyingly) scrolls the panel back to the top, every time you save.